UPDATED 2023-05
I couldn’t find how to do this anywhere, so I figured I’d share what I got sussed so far…
I can now use Siri to post directly to my DList inbox, say like:
- “Hey Siri, Send Dynalist”
- Immediately Prompts for voice input, so I speak: “Bleh, Bleh” (I use the count chocula accent for this, of course).
- When finished speaking I tap the screen to stop the recorder. The message is posted within moments to my DList InBox.
I’m not using “email to DList”, I’m posting direct, and the result is practically immediate.
I did this in iOS12 using “Dictation” via Shortcuts, because I’m using older iPhone. I heard rumors iOS 13 may allow direct input with Siri (?). For now this is what I got…
Notes on Setup / Configuration
Essentially this uses IFTTT bridging input from iOS Shortcuts App to DList API.
Prior to iOS13 you would need to use ‘Dictation’ feature to use Siri for voice input (I found no other way to do it using voice from/with Siri).
So the Pathway Map is Siri → Dictation → Shortcut Variable → Shortcut Link to IFTTT Trigger Event → Your Dynalist Inbox
If you are unfamiliar with IFTTT and iOS SHortcuts, it is recommended you do some web searches for reviewing some IFTTT WebHooks, and also some vids on iOS Shortcuts Siri …so you can gain an idea on how to navigate their stuff. I put some links I thought might be helpful at the end, and I added some snapshots for iOS Shortcuts in a following post below.
So Here’s How To Set It Up…
First: Get your DynaList API secret token if you don’t have it yet.
https://apidocs.dynalist.io/#general
I’m using the Send to InBox endpoint, data here:
https://apidocs.dynalist.io/#send-to-inbox
Be sure to Install “Shortcuts” app on your iPhone.
Examplt IFTTT setup of your “Event”…
Step1: Choose Service: WebHooks
Step2:
a) Choose Receive a Web Request
b) Event Name: send_to_dynalist (can name it anything -no spaces)
then Click Create Trigger
3) Click “That” (for “then that” setup)
- Select Service Webhooks
4) Select Make a Web Request
5) …entry…
URL: https://dynalist.io/api/v1/inbox/add
Method: POST
content/type: application/json
BODY (format): {“token”:“your-DListAPIkey-here”,“content”:“{{TITLE}}”,“note”:“{{NOTE}}”}
BODY (actual used): {“token”:“your-DListAPIkey-here”,“content”: “{{Value1}}”}
…where “your-DListAPIkey-here” is what it says, and Value1 is selected from the “Add Ingredient” link below the text-entry box. When you click inside the box after slecting that it will show with those brackets. Keep all the quotes you ssee there in the BODY entry.
Click Create Action
6) No need for notification -just Click Finish
======
7) In IFTTT go to My Applets, Services, Search WebHooks, Choose “Documentation”.
Here you can look at template for your event trigger action -you will use this info in Shortcuts on iOS. (Webhooks Integrations - Connect Your Apps with IFTTT)
Retrieve data…
You’ll need…
Example Post/Get Web REquest: https://maker.ifttt.com/trigger/{event}/with/key/{IFTTTkey}
Retrieve1: “Webhooks Integrations - Connect Your Apps with IFTTT”
Retrieve2: “{IFTTTkey}”
…{event} is that label from 2b above
You will use these in the shortcut you’ll be creating in the Shortcuts app on the iPhone
################
Download Shortcuts for iOS on your device and Launch it
NOTE: This is totally unpolished. I never used any of this IFTTT or Shortcuts before. I am certain I have a few things in there that I don’t need. If/As I may clean it up I will update this post later. YMMMV ;^)
Framework: Right now the Shortcut structure I have looks like this:
-
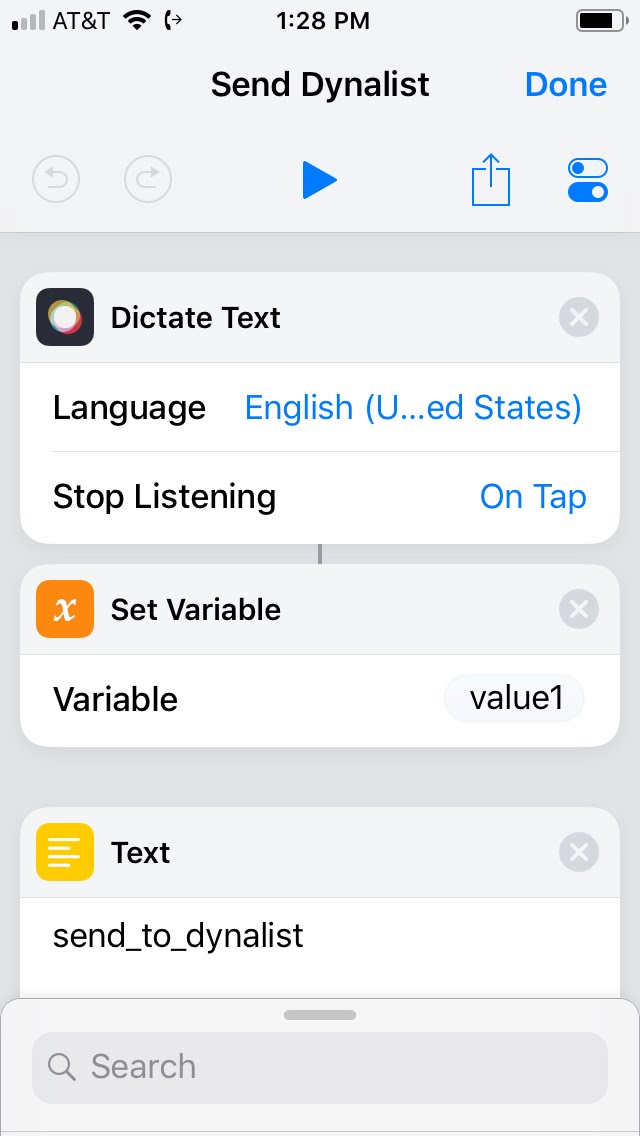
Dictate Text -Set Language, then Set Text: Stop Listening on tap
-
(Not Necessary: Set Variable: Variable / value1 )
-
Text (IFTTT EventName from step 2b above): send_to_dynalist
-
- You will later Label this “Text” token~variable to “SendDListEvnt”
-
Text: IFTTTkey (from Retrieve2 above)
-
- You will later Label this “Text” token~variable to “IFTTTKey”
-
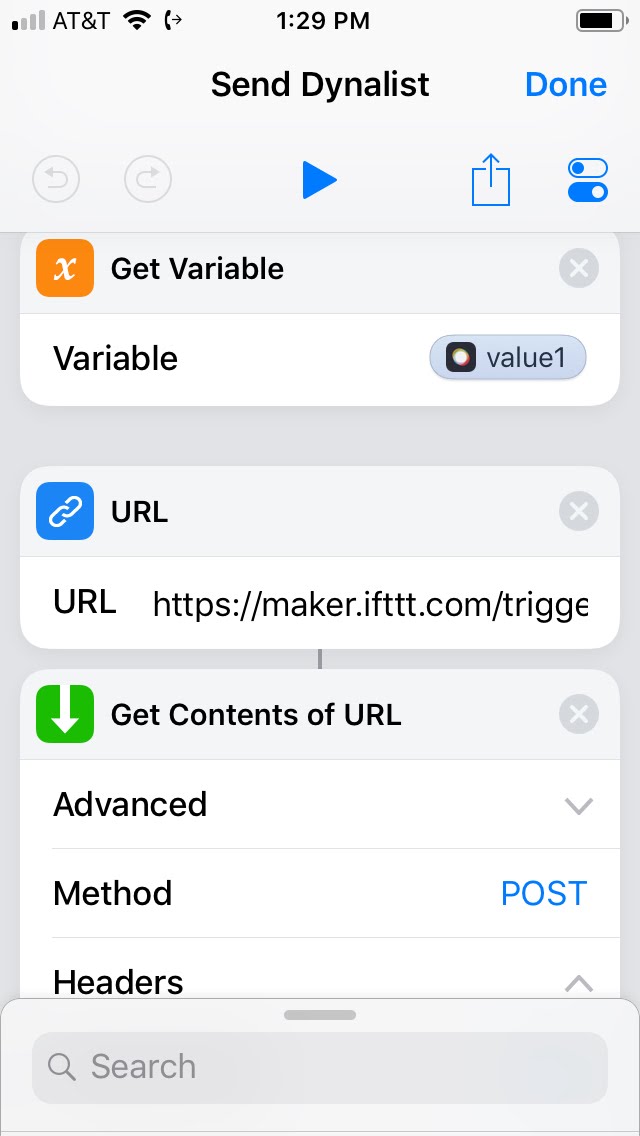
Get Variable: Variable / value1
-
URL: https://maker.ifttt.com/trigger/SendDListEvnt/with/key/IFTTTKey
Token Entries: Type the above URL the way it appears; You then need to replace “SendDListEvnt” & “IFTTTKey” label~placeholders with their relevant text token~variables. To do this…- First Select the label~placeholder by tapping on it 2x and then choosing “Copy” …and leave it highlighted.
- Then Click “Select Variable” in the bar above the keyboard to open the 'Magic Variable selection dialog. Then scroll to Choose the relevant “Text” variable. It will be posted into your URL.
- Then, Click on the variable in the URL to edit its “Variable Name” by tap-and-pasting into its entry field (it will show ‘Text’ greyed out). You can simply type it in there as well.
– I know… it seems tedious, but it is the simplest way to do this since you cannot edit Text item Labels directly AND trying to add Variables while typing a URL is horribly difficult. Trust me.
-
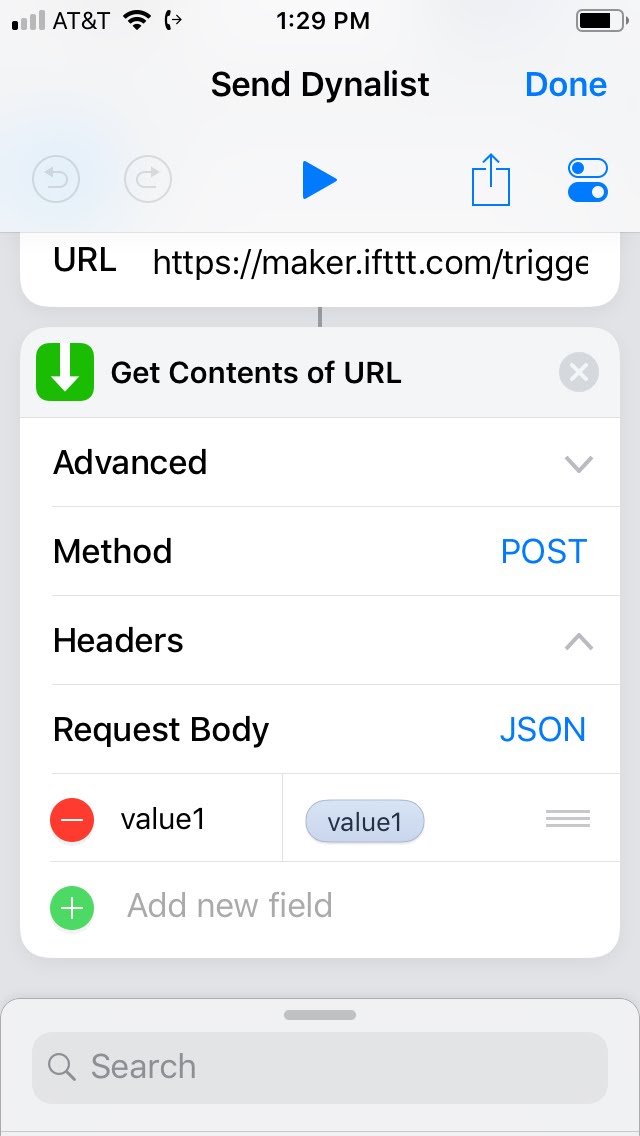
Get Contents of URL: Method POST, Request Body JSON, then Click…
- Add new field:
- Choose (type) “Text”
- Click in the “Key” entry field and type “value1”
- Click in the "“Text” entry field and then SCROLL the “Select Variable” bar and look for either “Dictated Text” OR it may be “value1” …a blue icon, not an orange one.
- Click Done
-
Set Siri enabled (was needed in the earlier iOSprior to 15 I think)
AND SHOULD BE GOOD TO GO. Test, close an duse it. You can rename the Shortcut for easier Use with Siri. Etc Etc
########
##########
Following is a rehash of the above “Framework” which I think is fairly complete (and updated 2023). I will leave this “setup procedure” in here in case the added info may be helpful…
Setup Steps (you may wish to review one or two of the videos I posted below if this is totally unfamiliar to you -it’ll give you a good leg up on getting around in there). I also added some snapshots in the next post below.
-
Create Shortcut (button). This is what you will say to invoke Siri. For instance, Mine is “Dyno”.
-
Search “Dictat”, select and set “Dictate Text” up per the above.
-
Search “set v” and select and set “Set Variable” up to “value1”
-
search “text”, select and setup a “Text” item to EventName blurb from step 2b above. Mine is “send_to_dynalist” (without quotes). Best to rename these -I forget if you have to save first, but you need to be editing it to access the rename command for it (its a bit obscure).
-
Create another “Text” element and place your IFTTTKey in it. Rename it (to something like IFTTTKey).
-
Search “Get V” and select and setup “Get Variable” …Variable / value1 , where value1 is chosen Magic variable from [scroll up to] between Dictate and Set Variable
-
Search URL, Select it and Create a URL element and…
-
- place the portion of “IFTTT trigger URL” …up to but not including the {event}… in there. See Retrieve1 above.
-
- Followed by SendDListEvnt text token (you choose it from listed tokens above the keyboard -it will only say the word “Text”. You can rename it later if you didn’t already.
-
- Followed by “/with/key/” (without the quotes)
-
- Followed by IFTTTKey text token, (again, you choose it from listed tokens above the keyboard -it will only say the word “Text”. You can rename it later if not already done.
Resulting URL should look something like:
Webhooks Integrations - Connect Your Apps with IFTTT<SendDListEvnt_Token>/with/key/<IFTTTKey_Token>
Tip: Again, You can only rename these tokens after you add them to the URL string, so I would try to rename them while I am building the string. These tokens can be used in future Shortcut creations, and can be globally updated if/when you change these values in the future.
-
Search “Get Cont” and select “Get contents of URL”, and set that to
Method POST, Request Body JSON Text, and +Add a new field changing the keyname to value1, and then set its text to ‘variables’ (select): value1 -
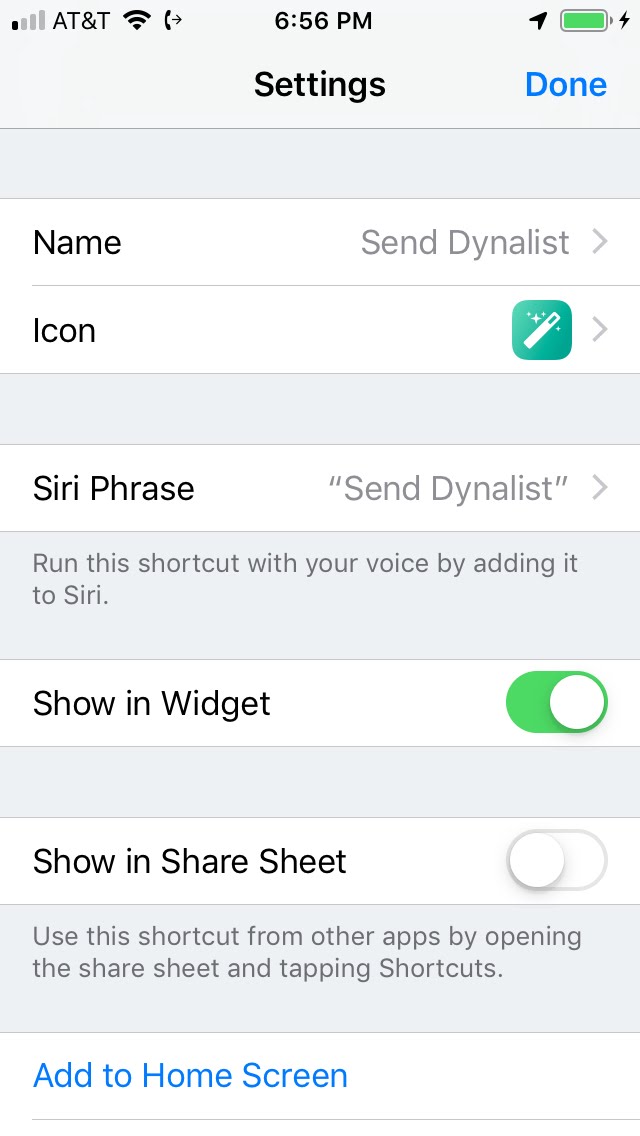
In the upper right corner, just below “Done” Tap the Switch-looking Icon that will take you into the Siri settings section.
-
- Check the Name (mine simply read “Send Dynalist”, and importantly then,
-
- Click into “Siri Phrase”. you should see “Run Send Dynalist” (or whatever your phrase is) AND
-
- CLICK “DONE” in the upper right.
-
Click Done Again
-
From here you can Click Done again and you’ll see your Button in the Shortcuts List. You could click the Play Button to test your Shortcut right there though.
And That’s pretty much all there is to it.
Good Luck!
Twohawks
=======================
From Here I will leave you with a couple links and resources to check out so if you are unfamiliar with all this, as I was and still am, it can help you get a leg up on some of the interface engagements.
Tutorial 6: IFTTT Web Hooks + Siri
Control Any IFTTT Action with Siri!
How to Trigger IFTTT Applets with iOS 12’s New Shortcuts App and Siri By Federico Viticci